Pattern tweak: Coda sweater

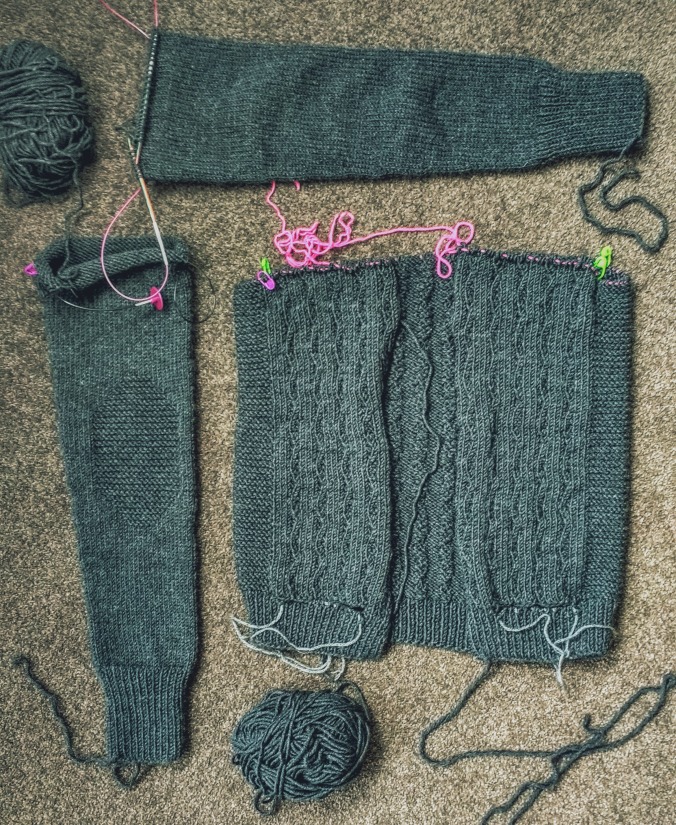
Yuppie! The Coda sweater is finished! This was my second ever pullover, and man it took some patience… To think I got started on it during our Christmas holiday in Tenerife, and thought I would finish it on the flight here to New Zealand… At least, now I have various reasons to be proud of myself:

  1. This was a stash-decreasing project, where I had to deliberately find a pattern to use yarn originally designated to become something else. Eight skeins put to good use, check.
  2. I had a limited amount of yarn to work with, which meant I had to go especially stingy. I skipped the tubular cast on (which is a pity) and I actually had to re-knit and shorten the sleeves. Ripping, check.
  3. More re-knitting was required for the back, as I was not able to perform an acceptable seam at the centre of the back cable. More ripping, check.
  4. I mastered the much dreaded kitchener stitch and wrap and turn short rows. New skills, check.
  5. In order to find an alternative solution for the back cable, I contacted a previously unknown fellow-knitter on Ravelry (see more on this below). Stalking/socializing, check.

Given that I think the reworking of the back cable might be useful for other knitters, I’ll try to give an account based on my scarce (I know… 😦 ) notes. Before that, I would like to thank Muriel (Ravelry user princessemumu) for her kind help, her Coda looks just wonderful! – I think much better than mine.

And with that, ladies and gentlemen, I present you…

The reworked Coda back cable

Disclaimer: I do not think this is the Holy Grail of Coda backs, but it did work for me. Please read through before deciding to go for it. Also, there may be errors in my math, but I think you’ll get the general idea and hopefully anyone who decides to try this solution, will be able to work it out.

The main idea is simple: In order to avoid the seaming the cable at the centre , it is worked as a single cable from the right side of the back to the left side. This means that the part of original pattern called Back (Convex arch shaping) has to be reworked. The way I did this is the following.

Centre convex shape in stockinette stitch

The original pattern instructs us to start knitting the stockinette section between the cables together with the right and the left cables, using some short row shaping, which essentially serves for us to be able to knit more rows of the cable, which will give the curve on both sides. What I did was to set aside the stitches for the cables, and work the stockinette section separately.

From the stitches held for the back, put 16 stitches counting from the right edge and 16 stitches counting from the left edge on waste yarn. You are going to work only the centre stitches, whose number must be [number of held stitches] – 32. So if you are working size 37, as I did, you’ll have 71-32 = 39 stitches on your needle for this section. Join the working yarn on the left side, starting to knit a wrong side row.

Setup row (WS):  Purl all stitches.
Row 1 (RS): SSK, knit to last to stitches, k2tog.
Row 2 (WS): P2tog, purl to last to stitches, SSK.

Repeat rows 1 and 2 two more times. You will have worked six decrease rows all together, and decreased 12 stitches. So, again, if you are knitting size 37, you will have 39-12 = 27 stitches left on the needle.

Starting the cable

Now you are going to start knitting the cable, running from the right side of the back to the left side. The first rows and the last rows will not be joined to the centre section you have just knitted, you will seam them together later.

Turn your work to the wrong side, shifting the stitches you have just worked to the needle. Now, pick up the 16 stitches you set aside for the right cable. They should be on the left needle with the wrong side facing, as you are going to start knitting with a wrong side row, placing a marker to separate the cable and the stickinette stitches. If you feel lost, just transfer the stitches from the previous section on a waste yarn, and work only with the 16 cable stitches on the needles for now.

You will be joining new yarn to work the cable starting with a wrong side row. You will be working the first set of short rows over the cable, as described in the pattern, only, you’ll only knit the part concerning the first 16 stitches and Chart A.

Setup row (WS): P2tog, YO, purl 1, knit 2, purl 9, knit 2.
Short row 1 (RS): Work Chart A across first 12 stitches, wrap and turn.
Short row 2 (WS): Work last 12 stitches of Chart A.
Row 3: Work Chart A to the end, working the wrap together with the wrapped stitch).
Row 4: Work Chart A.

Work rows 1-4 two more times.

Joining the cable with the stockinette section

If you put the stitches from the centre stockinette section on hold, now is the time to put them back on the needle. You will have all the stitches (stockinette section + 16 stitches for the cable) on the left hand needle, right side facing. If you have not done so, place a marker between the cable and the stockinette stitches.

You will start with working the section called Right Side Arch in the original pattern, as is, only you will not break your working yarn once you get to the centre of the stockinette section, but keep knitting. You will have to decrease all the stitches into the cable in the following way.

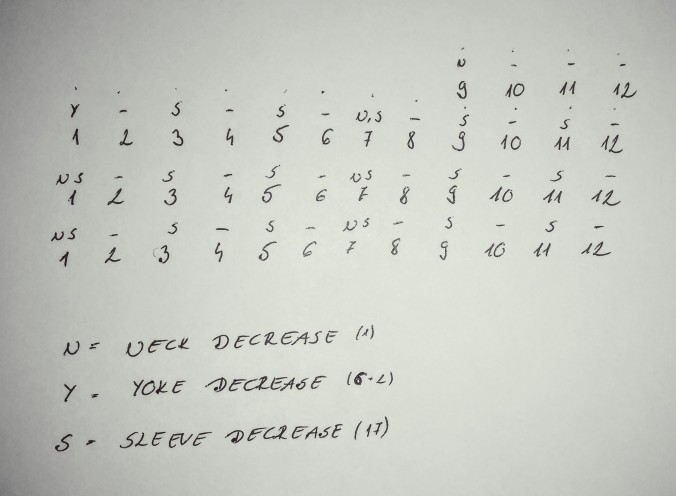
The original pattern instructs you to repeat short rows 21 and 22 of the Right Side Arch section a certain amount of times, but you will repeat them twice as many + one time. So, once again, if you are knitting size 37, you are instructed to repeat these rows a total number of 8 times, but you will do 2*8 = 16 repeats. By the time you are finished, you should have 6 stitches left from the centre stockinette section that have not been decreased into the cable.

Now what is left to do, is to replicate the beginning of the Right Side Arch section, only in the reverse, that is:

Short row 1 (RS, Decrease row): Work Chart A to marker (working wrap together with wrapped stitch-if any), slip marker, SSK, turn.
Short row 2 (WS): Slip 1 wyif, slip marker, work Chart A to the end.
Short row 3: Work Chart A across next 12 stitches, wrap and turn.
Short row 4: Work last 12 stitches of Chart A to end.

Repeat rows 1-4 four more times.

By this end of this section, 17 stitches should remain (16 cable stitches + 1 stitch).

Finishing the cable

To finish the cable, you will have to replicate the first short row section, again, in the reverse. On the first row, knit the last remaining stitch from the centre together with the last stitch of the cable (or SSK?).

Short row 1 (RS): Work Chart A to the end, working the wrap together with the wrapped stitch), and knitting the last stitch (or SSK?) together with the last stitch of the centre stockinette section (this needs to be done only on the first repeat).
Short row 2 (WS):
Work Chart A.
Short row 3: Work Chart A across first 12 stitches, wrap and turn.
Short row 4: Work last 12 stitches of Chart A.

Repeat rows 1-4 two more times. Only the 16 stitches from the cable should remain.

Turn to the wrong side, and purl across the 16 stitches.

Finishing up

Join the remaining 16 stitches with the 16 stitches you set aside at the beginning on the left back using kitchener stitch.

To close the gap between the cable and the centre stockinette section, stitch the two together, imitating the SSK stitches with the sewing strand (I wish I had made notes or photos as to how I did this…). This will be easier at the right back, as the decreases are already in the correct direction, but at the left back they are the opposite. I know this is not perfect, but at least it is at the sides of the back and not that visible. Better solutions are welcome.

—————–

Pattern: Coda  by Olga Buraya-Kefelian, BT Wool People Vol. 7

Yarn: 9 skeins of Drops Aplaca (held double) in Dark Lime

Needles: 4.5 mm (US 7) for the ribbing and 5 mm (US 7) for the body (knitted size 37)

Tips: How to keep track of complicated patterns?

Over the past two weeks or so I made a good progress on Chan’s Little Wave cardigan. It’s nice to knit with worsted weight yarn for a change, things progress much more quickly! I managed to finish the right sleeve last week, and by Wednesday this week I was done with the left sleeve as well. I couldn’t wait to join the sleeves to the body, and have all in one piece, but that is where things got somewhat tricky.

So now the whole of the cardigan – or what I have knitted of it so far – is sitting on one long cable, and I got to this point where the pattern says “Please read through to the end before proceeding“. I wonder if there is any knitter out there, who stands up and shouts hurray in joy upon encountering this sentence. What it usually means is ‘put down the needles, as what comes next is not knitting, but trying to get your head around the next bit, which may well take a good half hour’ – do you have any idea of how many rows I could knit in that time???!!! Of course, deep down you know you’d better take your time and get it right, otherwise what will follow is some grumpy frogging.

IMG_20160524_143640636_HDR

In this case, the mandatory reading session was due in order to take in the different notions involved in shaping the yoke and shoulders. I usually count rows drawing bundles of sticks in the middle of the pattern. I know row counters and mobile apps exist to accomplish the task, but I prefer to keep it simple. I find this a good enough way to remember where I left off when I pick my knitting up for the next time.

However, I needed something slightly more sophisticated this time. I had to keep count of the 12-row Little Wave stitch pattern, as well as the three types of decreases being the Yoke Decrease, the Neck Decrease and the Sleeve Decrease, which are repeated on different row counts. The pattern describes the stitch pattern and each type of decrease in a separate sections, pretty much as if it was the code for a computer program. Just because I’m a human, I thought it was best to translate this into more of a linear sequence that describes what exactly is needed to be done in each row. So this is what I came up with:

IMG_20160527_165614874

Just so you know, this is a much neater reproduction of the original (crammed into the white spaces of the pattern). But the idea is that the numbers represent the corresponding rows of the Little Wave pattern, and the letters over them show what decrease is due in each row, if any. I thought this was a practical idea, not only because the few minutes dedicated to drafting the scheme now allow me to joyfully knit away, knowing where exactly I am in the pattern and what I’m supposed to do next, but also because this way I could count the decreases before(!) I even started knitting them, managed to prevent at least one mistake.

I’m not experienced enough to tell whether this is common practice in knitting patterns, but here I encountered this type of instruction for the particular size I’m knitting: Repeat Neck decreases every 4th row [0] more times, then every 6th row [5] more times, then every 8th row [2]* more times. Now, the first time I drafted my little scheme, I assumed that I had to do the next neck decrease on the 6th row after the first one. However, I ended up having an extra decrease for the set number of rows I was supposed to work them over. Then I realized that probably what the pattern means is to count 4 rows, not decrease, and then count 6 more rows, this way having the second neck decrease a total of 10 rows counting from the first one. I’m not sure whether this is what is really meant, but at least now the number of decreases and rows seems to match.

If you have devised your own strategy to cope with puzzling parts of patterns such as this, don’t hesitate to share it! 🙂

*Note that these two decreases are not on the scheme, as they come later in the pattern, together with the shoulder decreases.

Left-handed knitting

My life in New Zealand has so far been pretty much of a solitaire on the knitting front. Besides the few occasions when I visited yarn shops, I haven’t met any real-life knitters or made any knitter friends. However, last Sunday may be the day to be remembered as an important turning point in the state of things. After a nice morning run in the Belmont hills, in the afternoon, we gathered for our first knitting session with two friends keen to learn how to wield the needles.

Now, I have only ever taught one person how to knit – with success! – so I wouldn’t consider myself well-versed in explaining how to cast on and knit a first row. But, eventually, it call comes down to some demonstration and gentle encouragement – and occasional rescue of dropped stitches. So, imagine my shock when one of the two friends said she was a lefty.

I sort of had a vague notion of having seen a paragraph or two speaking about left-handed knitting, but then again, these are the paragraphs most of us (the right-handed majority) just tend to skip.

left-handed-3

Lefties face difficulties on a daily basis trying to use tools designed for the right-handed majority (Image from: http://blog.ted.com/why-two-right-handers-were-compelled-to-create-a-ted-ed-lesson-for-the-left-handed/)

So how is a left-handed person supposed to knit? Well, left-handed people do things I would normally do with my right hand with their left hands. So it is only logical to think that the most comfortable way to knit for a lefty is to do just that. Cast on on the left needle, instead of the right, and knit accordingly. My friend, luckily – and probably due to plenty experience -, seemed to be very skilled in turning my right-handed knitting motion into her left-handed version. All set and problem solved – one might think. But far from that.

As she had completed her first rows and I was helping her to sort out a few dropped stitches, it dawned on me that something was just not right. She was knitting from left to right, instead of right to left. Which is fine if all you ever want to knit is a stockinette scarf with some ribbing, but suddenly it came to me that, with any more complex stitch pattern, she would end up having a mirror-image of the original. Let alone shaping. When, according to a pattern a right-handed knitter would be doing decreases for the right shoulder, she would be working on the left.

I was hoping that, as it often happens, a bit of research would enlighten me in some unexpected ways regarding this problem. However, what I found was no different from my own conclusion. In fact most knitting references (see example)  seem to encourage left-handed knitters to learn to knit in the same way as their right-handed peers, preferably using the Continental method. It is argued that since both hands are used for knitting anyway, this shouldn’t be overtly complicated. I would be curious about real lefty input on this matter.

It is also suggested that some people might still find the true left-handed method (described above) more comfortable. A useful piece of advice is to use a mirror in order to teach/learn this. So a left-handed learner can mimic the mirror image of right-handed knitting motion. The fact that patterns will have to be modified holds in this case though. Most (all?) knitting patterns are written for right-handed knitters, which is a situation similar to the way every day tools, such as scissors, can openers, mouses, etc. are designed for righty users. While colourwork can be easily reversed using a mirror, again, shaping, decreases, increases and cables require a more thorough revision of the pattern. Looks a bit tedious to me but some seem to think it’s not so complicated.

And through all this reflection on the difficulties of left-handed knitters, I came across this interesting short video exploring why most of us are righties and some of us are lefties in the first place.