I’ve always had a love-hate relationship with wrapping and boxes. On the one hand, it is in a way what turns something into a gift. You wrap something in nice colourful paper, tie a ribbon on it, and voilà, it’s a gift! On the other hand, wrapping – no matter how nice – will most likely end up in the rubbish soon after a gift is received. I hate to think of all the surplus material that necessarily goes to waste. This is the kind of excuse I’d use to avoid wrapping Christmas presents for years…
But lately, as a “blooming” handmade business owner/starter, I had to reconsider my position. These days packaging is an important part of the product. A nice box makes you think that its content is bound to be special, and sparks the urge of wanting to own it.
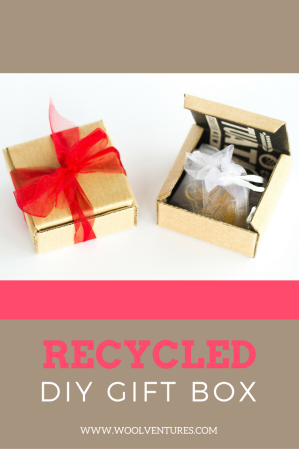
While I’m still in the phase of experimenting with most aspects of my handmade brand Árbore·do·fogo, I really wanted to create that ribbony special thing for the Christmas season. That is how the current Gift Boxes made of recycled cardboard – originally containing bottles of NZ craft beer – were born. And, I must say, I’m quite satisfied with myself here! They are just what I needed to add that authentic kiwi touch as well as the gift glamour to my jewellery.
With that said, I present you with the recipe of the DIY Gift Boxes.
What you need:
- Cardboard (a sheet of at least 12 cm*16.5 cm)
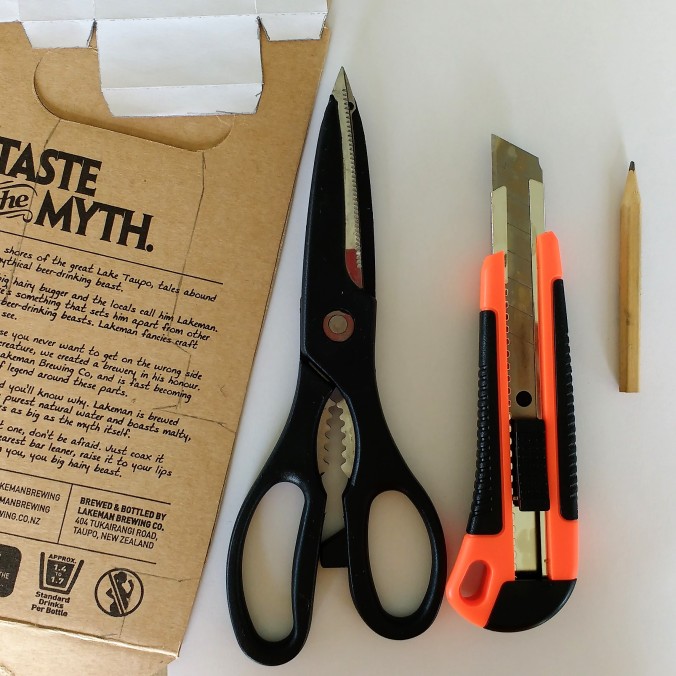
- Scissors and/or utility knife/box cutter
- Pencil
- Copy paper
- Ruler
- Glue
- Ribbon – optional


What you have to do:
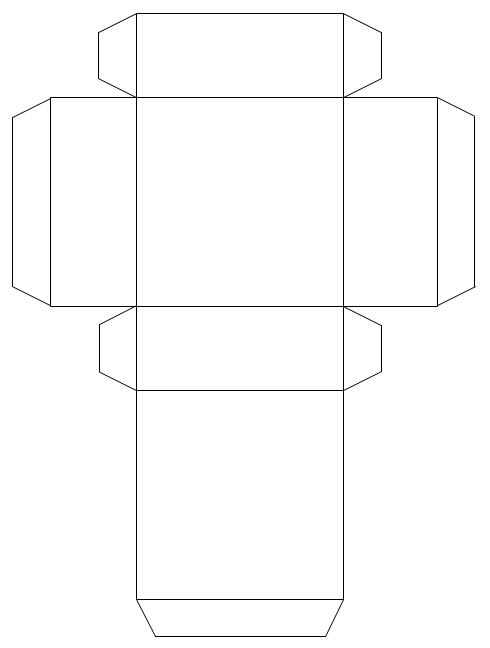
- Download and print the cutout blueprint of the box on copy paper. If all is fine, the square part should be 5.5 cm*5.5 cm, which will make the size of box on the photos. If it doesn’t happen, try playing around with your printer settings, or just make a box in a different size.
- Cut out the blueprint following the outer edges.
- Trace the cutout on the cardboard. Try align the edges to the sides to save yourself some work.
- Now cut the cardboard. I find it is faster – but more painful for the hands – to do this with scissors. The smaller parts may require the use of the box cutter. I try to cut just on the inside edge of the lines that I drew. If using the cutter, a ruler will help you cut in a straight line. Also, don’t forget to place a cutting mat or a cutting board underneath (your table won’t be happy otherwise!).
- Place the cardboard box cutout on the cutting mat with what is going to be the INSIDE of the box facing you. Now trace the inner edges – i.e. where the box will be folded – using the cutter. Be careful to use only a light touch, you only want to cut through the surface layer of the cardboard. Alternatively, you can use a ball point pen, or another pointy/sharp object to do this. Again, use a ruler to help you mark straight lines.
- Fold the box at the inner edged and see how it looks.
- Glue the small flaps to the inside of the box. Note: I found standard glue sticks quite useless for this task, and ended up getting a handy craft glue (see photos).
- Place your gift inside, and tie a ribbon around to box. Et Voilà, you have a gift!


